Thursday 6 November 2014

Using Workflow Techniques and Modularity


Even though the documentation is dated back to unreal engine 2 which is now almost 12 years old, the information about modular design, techniques and tips on planning your kits has helped me better understand issues that can occur when creating the assets.


The documentation goes into great detail on how to setup both modelling software and Unreal Engine 2 to the same scaling and grid spacing which allows the users to quickly and efficiently create assets with the knowledge they will be correct when porting them.

Reusing Pieces

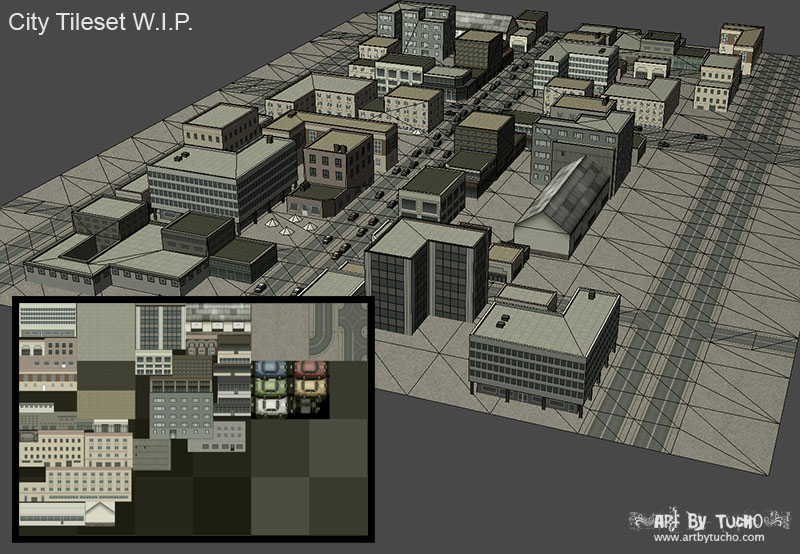
There is a quick overview on why using modular assets kits to create large scenes and re using assets multiple times can be beneficial not only for the level designers but also to efficiently use computing memory.
  • Re-using pieces doesn't take up any more space in memory, so more RAM can be devoted to higher quality meshes/textures, or costs such as AI.
  • Using the same pieces throughout a level or an area can help to unify the look and feel of your game. If used correctly, it can be a great help in tying locations together in space or in function.
  • Because you can use the pieces many dozens of times over, you can allocate your time to making higher quality meshes that will see heavy use, instead of many lower quality meshes that will get used and then thrown away.
  • Fewer total pieces are needed, because you can reuse them. This results in time and cost savings.
Re-usability

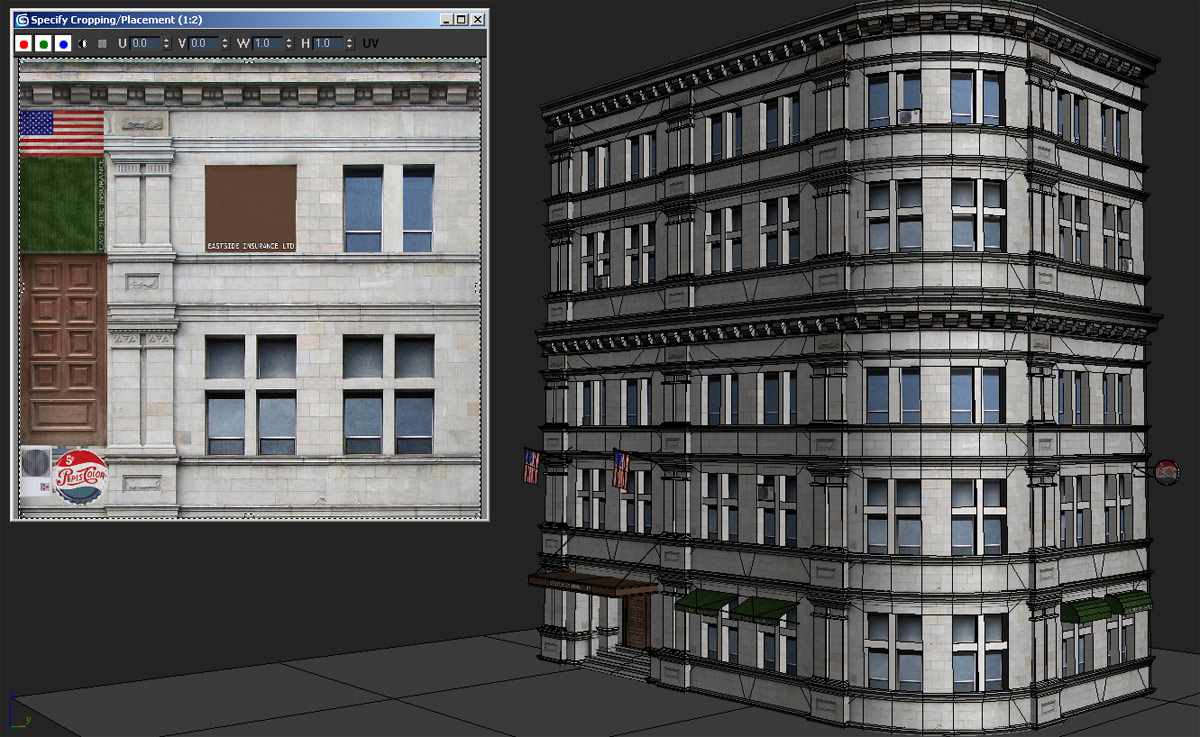
A major concern with making modular pieces is the fear that the player will be able to see the re-use of the chunks. This is a bad situation, not only because it looks sloppy, but because the player may get lost in an area that looks just like every other. Try to make a special effort to differentiate areas visually if they share similar pieces. You can do this in a number of ways. Try using the pieces in different combinations, using lighting in different ways (colored lights, projectors), creating custom geometry to set apart a location, or substituting textures on your modular geometry, to give it a very different look.

Pivots

The documentation goes over some common pivot issues when dealing with corners and stretching of assets when working on the grid

The example they use is some wall assets that have been designed to be modular but the corners pieces do not fit as the diagonal axis is wide that the horizontal which means either you are required to have another assets that fits this size or have the ability to stretch the original meshes to fit.

Summary

although a lot of the information in this documentation has been touched on in other readings I have undertaken its good to get more reference material covering the same aspects and issues involving the design and creation of modular asset kits.

The issues with pivot points and corner pieces was something I ran into during a module last year (Level design in UDK). Having experienced this issue first hand and having to work around it in my own way gave me a lot of experience in this area and I can fully understand and appreciate how important it is to plan the assets out prior to moving into the polish stage.

Reference


Lin, Lentz, Sturgill and Reed 'Using Workflow Techniques and Modularity' DOI http://udn.epicgames.com/Two/WorkflowAndModularity.html

Tuesday 4 November 2014

Using UE4


Why Unreal Engine 4?

I've decided to use UE4 as the engine to render my assets & scenes in because of the following reasons.
  • UE4 is one of the newer game engines released earlier this year, making it one of the most up-to-date game engines to be using.
  • It will be beneficial for me to learn and understand how to use the tools within this engine, giving me valuable experience and opening up possibility when looking for jobs in the industry.
  • Its a real time render so I will be showcasing the end result of the assets and scenes as it would be represented in the actual game.
  • Its good practice to be showcasing your models and environments from real-time renders as it shows the viewer the actual quality of the image rather than added details that would not be present in the actual finish produce.

Whats Changed?

With the latest release of Unreal Engine (4), there have been several changes to some important factors within the engine. Most of these changes have been done to simplify the user interface and the usability of the engine to new and experienced users alike.

1uu = 1cm
  • UE3 unit scale was 1uu = 2cm, this made using there grid system easier but caused issues when scaling assets and creating assets off the grid system. Using a 1:1 ratio and creating the grid to use this ratio will make planning and the implementation of assets into the engine much faster and easier.
  • Using centimeters will give designers and artists a much more accurate way to create there scene's and give them a lot more control on how it is built. The example of ft to cm is very accurate and will be used as a guide to scaling, so I will use a rounded up version of the centimeters when using UE4.
Collision Naming : UCX_
  • This is the exact same naming convention used for UE3 when importing a custom collision mesh into the engine.
Interface
  • The user interface of UE4 is vastly different from is previous version. They've gone to great lengths to simplify and organize the engine to be much more user friendly. The navigation of the engine world space is similar to 3D modelling software which makes it much easier to use when switching between programs.
Tutorials

There's a vast amount of information on the Unreal Engine 4 which was released at the same time as the engine. This information was released by Unreal to serve as the main information hub for all things UE4, this includes their YouTube channel, Wiki & Answer Hub which covers everything from the very basic's of the engine to the most advanced systems and operations.
  • Lightmaps & Rendering -
    • There is documentation on the Wiki that goes over lighting options and techniques in UE4 and I'll be referring back to this information once I've started to think about putting my assets into the engine.
  • Materials - 
    •  The Unreal YouTube channel has a collection of tutorials going over material editing and creation which goes over the basic's and more advance techniques used in the industry.
Summary


References 
Epic. (2014). Unreal Engine Tutorials. Available: https://www.youtube.com/user/UnrealDevelopmentKit. Last accessed 4th Nov 2014.
 
Epic. (2014). Unreal Engine 4 Documentation. Available: https://docs.unrealengine.com/latest/INT/. Last accessed 4th Nov 2014.

Friday 31 October 2014

Planning And Modular Workflow


In my search to find more information on modular environment creation I've found many different resources that go about creating environments in many different ways. The planning, creation and usage of the modular assets can vary depending on the needs of the game in which it will be used, the limitations on which the environment is created around and also the workflow that is used by the team of artists.

Polycount Wiki - LINK
Even though the tutorial is based around using Unity3D, the theory and planning surrounding modular asset and environment creation is used in other game engines and workflows. I found this tutorial interesting as it showcases how not only models can be used in a modular fashion but also textures by means of a texture atlas which requires additional planning while modelling the assets.

Whats a texture atlas?


Full Blast - LINK
A texture atlas is the name given to a diffuse map that is used across multiple models and has a number of different textures on it. This is used in some environments and used on weaker platforms as it saves on memory usage as the engine will only be drawing a single texture for a multiple assets/large environment.

This style of texturing can be used not only to texture large environments like cities or landscapes very quickly but also to texture separate assets in a smaller scene thus reusing a texture and saving on memory usage and project time.

Planning & Analyzing Research

When starting off with planning and researching the environment and style of the scene, its good to collect various reference material to help break down what textures you will need and how best to break up your modular assets to create easily usable pieces.

This tutorial goes over a techenique where you break down how many textures you need and how oftern they are used. He also goes over vertex colouring were its possible to use alpha channels with details such as cracks or graffiti that can be placed on-top of the original texture, thus giving more detail and variation to the scene. Breaking down the forms of a scene will help me understand how many different models and textures you will need to create.

Modular assets aren't just limited to the assets that snap and pivot together like the skyrim examples in my previous post here. Modular assets in a game environment are anything that can be used multiple times but can be slightly changed and altered each time, an example of this is grass, trees and rocks which are all the same models and texture but can vary in size, rotation, vertex painting for details etc.

Methods

In the tutorial he goes over three possible workflows when creating a scene.

Textures > Models
  •  The idea is to collect your textures in a texture atlas prior to creating the scene, this includes the spec/nor/gloss textures.
  • The benefit of this method is that you can apply your textures as you model the assets and have visual feedback as you create the scene.
Models > Textures
  • Blocking out your scene and planning out the modular assets as efficiently as possible prior to texturing
  • This process is slower to get to a point where you can visually see how the scene is coming together and can result in lose of interest in the project.
Both
  •  This method combines both previous methods together, this means you create a texture atlas then block out your scene. You can use these textures as a test prior to recreating the models and then recreating the textures
  • This workflow is slower and requires a redo of your initial test textures and models but can result in efficient and well planned out scenes.
Summary

The tutorial has given me a good idea on how I'll begin to plan out my environment once I've decided on an art style and theme for the scene(s).

This has mainly been research into how best to go about understanding a piece of concept art and breaking it down into textures and assets prior to jumping into the software and making it and the importance of thinking modular about the environment where possible.

References

tucho. (2012). Top down ship shooter . Available: http://www.polycount.com/forum/showthread.php?t=110194. Last accessed 31st Oct 2014

Metalix. (2012). Efficient planning and modular workflow for game enviroments. Available: http://cgcookie.com/unity/2013/01/07/efficient-planning-and-modular-workflow/. Last accessed 31st Oct 2014.

Monday 20 October 2014

Time Line Till Proposal

In anticipation of the proposal hand in, I've decided to layout my plans on what I'll be doing in the weeks leading up to Friday 7th.


A total of 37hrs has been put aside for the remaining time which should be enough to collect the remaining research material and complete a mock proposal prior to the hand in date. I have given myself a lot of time with the feedback / proposal changes as there may be topics or critical reference material I have missed or need to look at closer. Hopefully I'll get some feedback on the Friday 1st for the first mock hand in and will be able to work on my second mock proposal if required to or go straight to the hand in version.

There's a few key blogs & research tasks I need to spend a good amount of time on, probably alot more than I've tasked on this time table as I'm stating the minimum I must do.
  • Fri 24th - Decision on whether I'll be doing a interior or exterior modular asset kit
  • Sun 26th - Decision on architecture and theme for the scene(s)
  • Tues 28th - Criteria - Must get approval from Dave

Sunday 19 October 2014

Friendly Art - Vertex 2


Free Magazine - Here

In this article, Philip Klevestav explains why its essential not only for the artist's to plan out their asset creation but to also collaborate with the level designers to understand the importance of simplifying the modular design kits and keeping the assets friendly further into development. Philip Klevestav is currently employed as an Environment Artist at Blizzard Entertainment.

Standardize

Keeping a consistent measurements throughout the game is essential when designing modular assets and should be the first thing that is decided prior to creating the design kit. Collaboration with the whole team to decide on a standard unit scale and the testing of the design kit will help avoid adjustments to the game system later on in development.

Testing Design Kit

Testing out an asset kit before moving onto creating the final assets is essential. You want to test out as many assets as possible, usually the most common ones and use them in ways that may not be obvious at first. This ensures once they get to the level designers as finished assets, they will work as intended, the level designer already has knowledge of the asset kit and the level building should be both fast and efficient.


Design kits are basically prototype building blocks for your modular kit, not only do they serve you as the base test meshes for the final assets but they can also help you block out your levels / scene's fast or rapid prototyping.


Friendly Design

When creating both the design kit and the finial assets, you will end up with many different assets that can have different center points and possibilities of axis rotation. It's good practice to standardize a pivot point rule or system among the team and stick to it as much as possible, this will make using the assets in the level building stage much easier which will save time which in turn saves money/work.

Each asset can vary in terms of its pivot point, this is mostly determined by what the asset in question will be used for and if there are other assets that need to link up to that pivot point. Most modular pieces will be have there pivot point on a set unit position to snap to grid but some off grid assets may have it central to mesh.

Summary

This article was fairly interesting and informative and gave me a good idea of how I can improve on making my assets much easier to use, not only for myself but for anyone that may use them in the future.

He focused quite heavily on the idea that with proper planning, communication of the team and testing of the kit itself is not only recommended but totally essential in the design phase of the kit.

Further in the article he describes his experience with how player collision can affect your design choices with assets and when texturing assets that it needs to be readable and not over used or complicated to the players. I'll probably go back on this last section once I've done some more research and got some prototype assets created for testing.

Reference
  • Philip Klevestav. (2014). Friendly Art. Vertex. 2 (1), p24-31.